interview question and answer

July 21, 2012

unlock huawei e1732 idea netsetter permanently

unlock huawei e1732 idea net setter permanently


a new way to unlock huawei e1732 idea netsetter permanently

many people had problems with unlocking idea netsetter huawei e1732. so here is a new method introduced by nill and it works 100%. first of all you must have patience doing this. because the process it bit long. and also you have to download some softwares. and while downloading the software you will have to disable your antivirus as the crack for the cdma workshop is considered a virus by many anti virus softwares. so these are the things that you should note while unlocking your huawei e1732 idea netsetter usb modem. and also you should not start your huawei e1732 dashboard

so here is the step by step guide to unlocking huawei e1732 idea netsetter

  • download the cdma workshop and save the cdma workshop v 2.7.0. you must disable antivirus before opening the cdma workshop
  • download huawei e1732 downgrader
  • insert a non idea sim to your huawei e1732 netsetter
  • now you must find the common port to which your huawei e1732 modem is connected. you can do this by.
    • Right click on your “My Computer” icon > Properties > Device Manager > Ports (COM & LPT)  > HUAWEI Mobile Connect – 3G Application Interface (COM[The port number appear in your system])
  • note down the com port number into which your huawei e1732 idea netsetter modem is connected
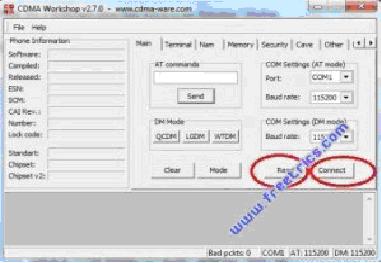
  • Run “CDMA Workshop v2.7.0.exe”
  • Select the Port that you noted from your Device Manager under the Port option in “COM Settings (AT mode)” under the “Main” tab.

  • then click on connect and then click on read

  • Go to the “Security” tab > Type “000000” in the blank box under “SPC” > Click on “SPC” button > Click on “Send” with Default (nv_read) as SPC.

  • Click on “Memory” tab > NV Items > Read > Now a “Conform” box will appear > Click “OK” > Now a “NV Items Backup” box will appear > In the box straight to “Last NV Item” type “9999” > Click “OK” > Save the file by giving a file name you like (Eg: E1732Unlock etc.)

  • When the buffer reach “100%” your file is saved successfully > Now a “Information” box will appear > Click “OK” > Minimise “CDMA Workshop v2.7.0”
  •  Run “E1732 Downgrader” >  accept the agreement > Next > Wait for a few seconds until the search for your modem finishes > (Don’t mark on “Auto remove the device after update”) Next > (Don’t remove your data card until the process is finished) > Start > At the end of “Downloading Programs…” you will get a “Update Failure!” error dialog box (DON’T WORRY & DON’T GET DISAPPOINTED) > Click “OK” > Click “Finish
  • Restore “CDMA Workshop v2.7.0” > “Main” tab > Disconnect
  • Unplug your Idea Netsetter (Modem) from your computer.
  • Again Plug it to the Computer > Check the “Port” again from the “Device Manager”
  • Go to “CDMA Workshop v2.7.0” select the Port that you noted from your Device Manager under the Port option in “COM Settings (AT mode)” under the “Main” tab as we did before > Click on “Connect” > “Memory” tab > NV Items > Click on “Write” > A “Confirm” box will appear > Click “OK” > “Open” dialog box will appear > Open the file that you saved before > When the buffer reach “100%” a “Information” dialog box appears with a success message > Click “OK” > “Main” tab > Disconnect
  • Now close “CDMA Workshop v2.7.0” > A “Confirm” dialogue box will appear > Click “NO”
  • Close everything > Enable your Antivirus
  • That’s it. Your Idea Netsetter E1732 is unlocked successfully.
  • Unplug Idea Netsetter (Modem) from your computer.
  • Again Plug it to the Computer.
  • Wait for Idea Netsetter to Start
  • Put a SIM Card other than IDEA to the Netsetter / ModemIf it again shows “The SIM/USIM card not been detected or is invalid” (DON’T GET DISAPPOINTED) > Click “OK” > Wait for the SIM card to be detected > It will detect the SIM card and enjoy browsing with any other SIM.
  • to make new mobile apn settings you can download huawei mobile partner. read and download mobile partner from this page


many people are having problem while connecting to internet with other sim cards
now you can connect by any sim card with default IDEA net Setter Dashboard using these steps
If your Modem is detecting sim cards and you are getting errors then do this
for XP
1 Control Panel -> Phone and Modem (found directly in control panel or in Printers and other hardware ) –> modem tab –> huawei mobile connect 3g modem (which is present on COM ) –> –> properties advance –> in extra initializing command use given commands and click OK
for windows 7
start menu -. type phone and modem — click on it—>modems –>huawei mobile connect 3g modem–properties–>change settings–>advance–>extra initialization command–>use given command
and if it ask for Country and area code then Country – India and Area Code – 91 and leave other blank
commands are here
Aircel – AT+CGDCONT=1,”IP”,”aircelgprs”
Airtel – AT+CGDCONT=1,”IP”,”airtelgprs.com”
BSNL – AT+CGDCONT=1,”IP”,”bsnlnet”
Idea – AT+CGDCONT=1,”IP”,”internet”
Reliance – AT+CGDCONT=1,”IP”,”rcomnet”
Tata Docomo – AT+CGDCONT=1,”IP”,”tata.docomo.internet”
Videocon – AT+CGDCONT=1,”IP”,”vinternet.com”
Vodafone – AT+CGDCONT=1,”IP”,”www”
if you have any trouble doing this please comment here


Use Idea Net Setter(Huawei e1550) with BSNL, Airtel, Docomo, Vodafone, Aircell


Use Idea Net Setter(Huawei e1550) with BSNL, Airtel, Docomo, Vodafone, Aircell


I recently got myself an Idea Net Setter 3G Data Card. The price for 2G Data services are too high by Idea. Unlimited plan costs Rs.699/month. So I thought of unlocking it. After unlocking I have tested it with Idea, BSNL, Airtel and it works perfect. 


Steps to unlock Idea Net Setter


DISCLAIMER: Please use at your own risk. I'll be not responsible for any loss/damage.


Before beginning, download the files below:


Now...lets begin.


Step-1

Plug in your modem with the idea SIM card you got(don't bother if its not activated)


Step-2

Run the setup from Download No.2. Now you will be asked for Flash Code.


Step-3

Run the .exe file from Download No.1. Key in the IMEI no. you can find it on the Box. Click calculate and the unlock code and flash code will be generated. Use the flash code at this moment.


Once the firmware is updated, close the setup.


Bingo!!!... your Net Setter is unlocked.


Now Run setup from Download No.3. This will remove the default Idea Net Setter Dashboard and write a new one onto the firmware. Once complete. Remove your Modem and replug.


When you plug-in it will Autorun. install the new Dashboard. It also has voice calling enabled. The newer dashboard is awesome. 


Now you can remove the Idea SIM and plug in any GSM SIM you like.


Note: Before you begin, make sure you have proper power backup plan. If the power goes off during firmware update, it will brick your modem.

July 18, 2012

Setting up a Logon Script through Active Directory Users and Computers in Windows Server 2008


Setting up a Logon Script through Active Directory Users and Computers in Windows Server 2008

You can use logon scripts to assign tasks that will be performed when a user logs on to a particular computer. These scripts can carry out operating system commands, set system environment variables, and call other scripts or executable programs. Some tasks commonly performed by logon scripts include:
  • Mapping network drives
  • Installing and setting a user's default printer
  • Collecting computer system information
  • Updating virus signatures
  • Updating software
Basically, there are two ways to assign Logon scripts. The first is done on the Profile tab of the user properties dialog in the Active Directory Users and Computers (ADUC). The second is done via Group Policy Objects (GPO). This article will focus on the first method.
It's worth noting that using the first method – via the Profile tab of the user properties – will work for any Microsoft-based operating system, and is especially useful when you have older clients such as Windows 95/98 or Windows NT. These types of operating systems do not use Group Policies. If you assign the logon script in both ways for a user, if the user logs on to a computer running Windows 2000 or above, both logon scripts will run. Therefore it's recommended you only use one of the methods. You can read more about it on my "Setting up a Logon Script through GPO in Windows Server 2008" article.
Note: Using Windows Server 2008 Active Directory Users and Computers (ADUC) to assign logon scripts is mostly the same as it was in Windows 2003, but having some people asking me questions about it in Windows Server 2008 has triggered the writing of this article.

Creating the logon script

The logon script is the file that does the actual action. It could be almost any action, as noted above. So we'll start by creating that script. The default location for logon scripts is the NETLOGON share, which, by default, is shared on all Domain Controllers in an Active Directory forest, and is located in the following folder:
%SystemRoot%\SYSVOL\sysvol\\scripts
Where %SystemRoot% is usually “C:\Windows” and is the DNS name of the domain, similar to “Petri.local”. This folder, which is a part of the SYSVOL special folder, is replicated to all the Domain Controllers in the domain.
Note: The actual process of creating the script is beyond the scope of this article, there are plenty of good resources with great examples on the Internet.

  1. Create the logon script and give it the appropriate name (for example: logon.bat, logon.cmd, logon.vbs, etc.) The script can use ANY name, just make sure you know what that name is, and give it the right file extension type.
  2. Make sure that the script runs and performs the required action when it is manually run (double-click on it).
  3. Copy the logon script (CTRL+C).

4.Paste the logon script in the NETLOGON share on one of the Domain Controllers. The NETLOGON share is located in the following path: c:\Windows\Sysvol\Sysvol\Domain Name\Scripts.
Note: You can enter a UNC path in the “Logon script” field and place the file in another location. However, this location should be one that is replicated to all Domain Controllers, and unless you have such a folder available, I'd suggest you keep to the NETLOGON share

What permissions are required for Logon scripts to run?

Logon scripts run with the credentials of the user. It is recommended that the “Domain Users” group shall be given permission to any resources used by either of these scripts. For example, if the logon script writes to a log file, the group “Domain Users” should be given read/write access to the file or the folder where the log file is located. Most users have limited privileges on the local computer, so logon scripts will have the same limited privileges.

Assigning the script to the user

Next, we need to decide what user should have the logon script. We will work in that user's user account in Active Directory Users and Computers. With this procedure, you can only link ONE logon script to each user, and you must do it ONE USER AT A TIME, or, if you have the knowledge – script the changes in Active Directory (there are methods to do this, but I won't get into detail here).
If you plan to have more than ONE logon script, and if you wish to assign that/those script(s) to more than one user, you might want to look into the "Setting up a Logon Script through GPO in Windows Server 2008" article.
  1. Open Active Directory Users and Computers from the Administrative Tools folder (or dsa.msc from RUN).
  2. Expand the domain tree, locate the OU where the user is located.
  3. Right-click the user object, select Properties.

  4. In the Profile tab, locate the Logon Script box.
5. In the Logon Script box type the name of the script from step #2. You DO NOT need to enter the path, since it is located in the NETLOGON share. Make sure you enter the full name (i.e. logon.bat or logon.vbs etc.).


                           6.Click Ok.

Replicate the DCs

Now we need to replicate the DCs in the domain by using either Active Directory Sites and Services, Replmon, Repadmin, or wait a few moments (depending on the number of DCs). As a simple follow up to this article, I suggest you use Active Directory Sites and Services.

Testing the logon script

  1. On one of the computers that is part of the domain, logoff the specific user account.
  2. Logon and test.
If the logon script doesn't work for you, go back to the basics and see if it works at all by double-clicking on it. See if it's placed in the right path – the NETLOGON share on one of the DCs, and see if it has replicated to the other DCs. Also check permissions by trying to manually run the script from the right path but while logged on as the user, and not as an administrator.


Understanding swap files in Linux


Understanding swap files in Linux


Summary If you run anything close to a modern operating system, you almost certainly interact with a swap file. You might be familiar with the basics of how these work: they allow your OS to prioritize more frequently-used pages in main memory and move the less frequently-used ones to disk. But there’s a lot going on underneath the covers. Here’s a simple guide to swap files in Linux.
To appease some of my hungrier applications and support heftier development efforts, I recently upgraded the memory on my system from 4 GiB to 8 GiB. That gave me occasion to tinker around with the swapping behavior of my system and check things out.
If you run anything close to a modern operating system, you almost certainly interact with a swap file. You might be familiar with the basics of how these work: they allow your OS to prioritize more frequently-used pages in main memory and move the less frequently-used ones to disk. But there’s a lot going on underneath the covers. Here’s a simple guide to the theory and practice of swap files in Linux, and how you can tweak things for your benefit.

An abstract memory model

It’ll be useful to have a mental model of the way memory works in general1, so we’ll start from the basis of a simple one here.
In general, all computers have access to physical memory, where the actual bits are manipulated and stored for use. Most modern operating systems present physical memory to higher-level applications as an abstraction calledvirtual memory. This allows applications to see memory as if it were a contiguous block, even though the underlying physical memory may theoretically be taken from many arbitrary, heterogeneous sources — multiple memory chips, flash memory, disk drives, and so on.
The memory manager divides virtual memory into chunks of identical size called pages. A page is the smallest amount that the OS will allocate in response to requests from programs. It is also the smallest unit of transfer between main memory and any other location, such as a hard disk. The size of a page is usually fixed by the operating system’s kernel2.
Applications see virtual memory as a contiguous resource divided into units called pages. A typical page size for a modern desktop system is about 4 kilobytes.
As pages are allocated to applications, they are assigned pages in the physical memory space through a special mapping called address translation. Applications don’t know where they are in the physical space; they see only the pages they use.
Address translation maps virtual pages onto physical pages. This mapping is transparent to applications.
The memory manager knows how to aggregate different backing stores to provide the abstraction of contiguous virtual memory. By updating the address translation mechanism so that a virtual page always points to the correct physical page, the memory manager may move pages around in physical memory without directly impacting applications.
The backing stores for pages can be quite heterogeneous.

Wide variation in different kinds of physical memory

Not every backing store displays the same storage and speed characteristics. If different types of physical memory display different characteristics, the memory manager can exploit these differences to optimize system performance. It can make intelligent decisions about which pages should go where.
Consider the difference between main memory and a hard drive, for example.
characteristicstorage medium
on diskin main memory
absoluterelativeabsoluterelative
access time5ms10ns500,000× faster
peak transfer rate80 MB/s8 GB/s100× faster
storage space100 GB25× larger4 GB
price/GB storage$0.60/GB20× cheaper$12/GB
Some comparisons of a typical hard drive and typical main memory on a consumer-grade desktop.
Because storage on disk-backed file systems does indeed have different characteristics than storage in main memory, there’s significant room to optimize depending on the characteristics of how pages are accessed. As the table shows, hard disks are several orders of magnitude slower and less efficient at retrieving data than main memory. Thus, the memory manager needs to carefully balance the demand for memory against the different kinds of supply.

Flavors of pages

If all pages were of the same kind, deciding which pages should go where would be a simpler decision. For example, one strategy is to make the access time quickest for the pages that are accessed the most frequently. Unfortunately, it’s not just the types of memory that are heterogeneous, but also the contents of the pages that are stored there. On Linux, there are four different kinds of pages.
  • Kernel pages. Pages holding the program contents of the kernel itself. Unlike the other flavors, these are fixed in memory once the operating system has loaded and are never moved.
  • Program pages. Pages storing the contents of programs and libraries. These are read-only, so no updates to disk are needed.
  • File-backed pages. Pages storing the contents of files on disk. If this page has been changed in memory (for example, if it’s a document you’re working on), it will eventually need to be written out to disk to synchronize the changes.
  • Anonymous pages. Pages not backed by anything on disk. When a program requests memory be allocated to perform computations or record information, the information resides in anonymous pages.
When the in-memory version of a page is the same as the one on disk, we say that the page is clean; the contents are the same. But sometimes the contents of a page have been updated since the last time they were read. When this happens, the page becomes dirty.
A clean page can be repurposed for something else easily; no updates need to be made, and the page can simply be recycled. But a dirty page has to be written back to disk before it can be used again. For file pages, this is an expensive operation, so the kernel tries to avoid the overhead of flushing back to disk when it can.
For anonymous pages, there’s a different problem. Effectively, they’re always dirty: the very act of creating the anonymous page means that there is now data that is in memory which isn’t in disk. If the kernel wants to use anonymous pages for something else, it must first reclaim them. But anonymous pages have no files to back them. How can you flush something back to disk when there’s nowhere to flush it to?

Swap files

The use of swap can resolve many of these issues. Swap is a disk-backed area that’s treated as an extension of main memory. It serves as a holding area for pages that have been evicted by the kernel. Let’s use an illustrative example to show how swap files help make memory work better.
Legend for the next few diagrams. Unused pages have dotted borders; dirty pages have an alert symbol; and anonymous and file pages are colored orange and green, respectively.
When a moderately loaded system gets additional requests for memory, the kernel generally draws from the pool of free pages first to fulfill these requests. If there are few free pages remaining, the kernel tries to flush clean pages to make room for the new requests.
The kernel prefers to go after unused pages first.
If the clean pages also become depleted, the kernel is forced to clean a dirty page and then flush it. This is an expensive operation. For this reason, the kernel tries to maintain at least some clean pages all the time.
When the ratio of anonymous pages to dirty pages is high and the number of clean pages is low, the kernel is running out of memory. Without swap, this situation will require a number of costly disk writes. Consider a request for allocation when a number of dirty pages are already present.
Without swap space, it’s easier for systems to get overloaded.
In the figure above, a request for two anonymous pages has come in. There are no more unused pages, so the kernel must drop one of the existing pages to satisfy the request. The kernel can use one page freely: the single clean file page in slot 6.
But to allocate the second page, the kernel now has to flush one of the dirty file pages (in slots 1, 3, or 4) back to disk to make room. It cannot move the page in slot 5 anywhere, because it is anonymous and has no backing store; there’s nowhere else to put it. Even if this page has not been used in a very long time, it must still occupy space in memory until the process using it has released the page.
When space is tight and there’s no swap the kernel must make room by cleaning dirty pages and freeing them. In this example, the kernel is forced to clean page #1 back to disk to make room for the second allocated page.
Without swap, the kernel gets boxed into this unfortunate corner more easily.
With swap, however, the kernel gets an additional tool to use in its arsenal. Instead of being forced to clean one of the dirty pages, it can instead evict one of the anonymous pages to the swap region.
When swap is available, the kernel doesn’t need to clean dirty pages, and can instead move anonymous pages to swap.
As in the earlier non-swap scenario, the kernel use can use the clean page in slot 6 for the first requested page. It is allocated and the clean page is dropped.
For the second requested page, the kernel must no longer clean a dirty page to make room. Instead, it can simply flush one of the anonymous pages to the swap region. The code required to do this is generally very simple and significantly less complex than cleaning a dirty page, and the kernel prefers swapping to cleaning dirty file-backed pages.

Optimizing your swap settings

Linux provides a number of ways to interact with your swap. Two are detailed here:
  • Aggressiveness of swapping
  • Adding and removing additional swap containers

Controlling aggressiveness of swapping

The more aggressively the kernel swaps, the more efficiently existing memory can be put to use. Pages that look like they’re not being used will be swapped out rapidly. If the kernel swaps too often, though, applications that were using those pages will take longer to become responsive again as the kernel swaps their memory back into main memory.
For a desktop user, responsiveness of applications can be important, so an aggressive swap may not be desirable, even if it results in less efficient use of memory. For servers and other non-interactive systems, more aggressive swapping may be appropriate and acceptable.
On Linux, this careful balancing act can be configured to meet your personal preferences. The kernel swaps out pages with a zealousness controlled by a swappiness setting.
Swappiness is an integer that ranges from 0 to 100, and indicates the degree to which the kernel favors swap space over main memory. Higher swappiness means that the kernel will move things to swap more frequently. Lower swappiness means that the kernel tries to avoid using swap. A swappiness of zero causes the kernel to avoid swap for as long as possible.
Ubuntu and several other Linux distributions have a default swappiness of 60. You can check your swap setting by reading a /proc/sys value:
$ cat /proc/sys/vm/swappiness
60
To temporarily modify your swappiness, simply edit this value:
$ sudo sysctl vm.swappiness=40
vm.swappiness = 40
This setting lasts until reboot or you change it again with another sysctl vm.swappinessinvocation. To make this setting take effect on every reboot, edit your /etc/sysctl.confconfiguration file.
$ gksudo gedit /etc/sysctl.conf
Find the vm.swappiness line; if none exists, add it.
vm.swappiness = 40

Adding swap containers

Modern operating systems generally have either a swap partition or a swap file. In a swap partition, part of the hard drive is sliced off and becomes dedicated to swap. A swap file is just an ordinary file that holds up to its file size in swapped pages.
A swap file is considerably less complicated than a swap partition to establish. There is no speed difference between the two3, so swap files are favorable in this respect. However, if you want to be able to hibernate or suspend your computer, using a swap partition is required in some cases. (These suspend/hibernate managers usually cannot handle writing to an active file system.)
Making a new swap file is a simple process. In this example, we’ll make a 2 GiB swap file and make it available to the system as additional swap space. We’ll use primary.swap as the name of the example swap file, but there is nothing special about the name of the file or its extension. You may use anything you wish.
First, we need to create the swap file itself. We’ll use a stream of zeroes as the input source (if=/dev/zero), and write it out to a file named primary.swap in the /mnt directory (of=/mnt/primary.swap). We will write 2048 (count=2048) blocks each 1 MiB in size (bs=1M). Depending on the speed of your hard disks, this may take a little while.
$ sudo dd if=/dev/zero of=/mnt/primary.swap bs=1M count=2048
2048+0 records in
2048+0 records out
2147483648 bytes (2.1 GB) copied, 30.1085 s, 71.3 MB/s
Next, we need to format this file and prepare it for use as a swapping space. The mkswap utility sets up a swap area on a device or file.
$ sudo mkswap /mnt/primary.swap
Setting up swapspace version 1, size = 2097148 KiB
no label, UUID=7be2b3b6-83b0-4afd-8537-197cf12f8c59
After formatting it, the swap can now be added to our system. Use the swapon utility to activate the swap region.
$ sudo swapon /mnt/primary.swap
You can verify that your swap space is now 2 GiB larger.
$ cat /proc/meminfo | grep SwapTotal
SwapTotal:     2097144 kB
Your changes will be lost at reboot, so if you want to make them permanent we’ll need to edit your filesystem table in /etc/fstab.
$ gksudo gedit /etc/fstab
Now add your swap file to the list of filesystems to mount at boot by appending a line to the file.
/mnt/primary.swap  none  swap  sw  0 0

Removing a swap file

Removal works much the same way, but in reverse. If you’ve added your swap to the /etc/fstablist, you need to remove it here first.
To disable your running swaps, run the swapoff utility. You can either specify the swap you’d like to disable, or use the -a parameter.
$ sudo swapoff /mnt/primary.swap
When you disable swap, you force the kernel to clean every page on the swap and/or push it back to main memory. If there is not enough space to squeeze everything in, you may receive out of memory errors from the kernel, so use this judiciously.

Conclusion

Swap files are an essential part of the memory-management modules of operating systems. In Linux, adding and removing swap partitions and files is simple, and you can control how the kernel interacts with swap through configurable parameters. Through the use of these and other techniques, and with an understanding of the basics of swap, you can tweak your system’s use of memory to your heart’s content.

Remove Copyright Protection from USB Flash Drive (Pen Drive)


Remove Copyright Protection from USB Flash Drive (Pen Drive)


Hey Freinds many times you face the following errors when their thumbs drives, memory card etc becomes write protected.


  • Cannot copy files and folders, drive is write protected

  • Cannot format the drive, drive is write protected

  • The disk is write protected

  • Remove write protection or use another disk

Media is write protected


Some times people say that suddenly their drive become write protected and they are not able to delete any files and folder on the drive and also not able to copy new files and folder to USB portable drive.


Let’s see how can you remove write protection on your portable devices like pen drives, memory cards, iPod and other USB mass storage devices.


Fix:

Write Protection on any portable USB Device can be applied by the physical lock provided on the card adjuster or some times provided on the pen drives, so make sure to make your drive not write protected by moving the lock in right direction.

But even after moving the physical lock for write protection the problem can happen due to some virus action. This happens when some virus or script which applies the registry hack to make any drive write protect when connected to the computer, In that case follow the procedure below to remove write protection from your pen drive.
1. Open Start Menu >> Run, type regedit and press Enter, this will open the registry editor.

2. Navigate to the following path:


HKEY_LOCAL_MACHINE\SYSTEM\CurrentControlSet\Control\StorageDevicePolicies

Note: If the registry key StorageDevicePolicies key does not exist, you will need to create it

Download this batch file called add.bat from here, and double click after download the key will be automatically added to registry.


3. Double click the key WriteProtect in the right pane and set the value to 0 in the Value Data Box and press OK button


4. Exit Registry, restart your computer and then again re-connect your USB pen drive on your computer. That is it, done.

IF this articles Not help you then your pen drive plug other PC then format 

Enjoy!!!!!!!!!!!!!!

July 15, 2012

Migrating Samba Server and Users in CentOS 6

Migrating Samba Server and Users in CentOS 6

To migrate Samba users from one server to another, we will be needing to migrate the following -

  1. /etc/passwd
  2. /etc/group
  3. /etc/shadow
  4. home directories and shared directories
  5. /etc/samba
  6. /var/lib/samba
We assume that we have two servers: old-server (192.168.10.10) and new-server (192.168.10.20). Some of the commands are need to be run in the old-server and some need to be run in new-server.

Old Server:
Backing up users, groups and passwords


NOTE: Please click here for explanation on what the awk command does.

Time to move the home directories using rsync


IMPORTANT: It is vital to preserve the permissions of the files/directories. Although there are many ways to do this, rsync is the easiest possible way.

NOTE: Shared directories can also be migrated the same as home directories. rsync can take care of it.

New Server:
First, we copy the /root/move directory from the old server to the new server.


IMPORTANT: Please backup you passwd, group and shadow file before the next step.

Then, we merge the *.mig files to the actual passwd, group and shadow files


IMPORTANT: Please make sure to use >> (append) and not > (redirection)

Now, it's time to prepare samba


If samba is up and running, netstat would show it.

This way, a Samba server with all it users can be migrated to a new system. Shutdown the old server and check whether the domain or shared directories can be used.

Samba Domain Controller Cluster Using Heartbeat and CentOS 6

Samba Domain Controller Cluster Using Heartbeat and CentOS 6

In this segment, we would be creating a Samba Server Cluster using Heartbeat and CentOS 6.

First, we start by understanding, what is a server cluster? A server cluster is a collection of servers that provide similar network services. They share an IP address/FQDN and the client hosts communicate with that IP/FQDN to obtain network services. The part to notice here is that multiple servers are used for auto redundancy and in cases, load balancing. Which simply means, even if one of the servers are down, the other servers would take over and the client will get the services from the backup servers. The whole process is automatic and with proper configuration, seamless. The client wouldn't even know that it's using a backup server.

For example, let us assume that server 1 and server 2 have IP address of IP1 and IP2 respectively. Both of them are configured as web servers. We have an IP address IP3 that can be resolved to www.testdomain.com. So, to create an auto redundant cluster, we configure the cluster in such manner that the servers share the virtual IP of IP3 between them so if anyone queries www.testdomain.com, he would resolve to IP3 and the request would be forwarded to the server cluster. Even if server1 is down, server 2 would be using the virtual IP of IP3 and would be able to provide services for www.testdomain.com.

Cluster configuration comes in many forms, and the complexity may differ from design to design. For example, the servers in the cluster may be configured to use an external common storage. like SAN or NAS. Again, there may be cases where each server has it's own storage and the configurations are identical on both servers.

Scenario
We have 2 servers
  • primary.example.inv (IP 192.168.1.1)
  • secondary.example.inv (IP 192.168.1.2)
  • Virtual IP: 192.168.1.100
  • A FQDN services.example.inv which can be resolved to IP 192.168.1.100
primary.example.inv is already configured as Primary Domain Controller for the domain example.inv. Please consult the earlier post on how to configure a Samba Primary Domain Controller. We would be configuring secondary.example.inv as the backup domain controller.

primary.example.inv Configuration
First, we have to keep in mind that the hostnames are really important. We have to set the hostnames properly in the following locations-


NOTE: If there is any confusion about how to set the hostnames, please consult an earlier post


Then, we have to setup heartbeat in the server. CentOS 6 still does have heartbeat RPMs in their repositories, so yum install will not work just yet. After googling for a while, I found heartbeat here

heartbeat RPM
heartbeat-libs RPM

Here's how we can download the heartbeat RPMs and setup some dependencies.


Great! We have installed heartbeat to our server :)

Next, it's time to configure heartbeat. All the heartbeat config files are stored in /etc/ha.d. We have to modify 3 files only. However, since the configuration files are not present yet, we will have to copy sample configuration files from /usr. Here's how it's done-


Time to edit to configuration files:


Different deadtime and initdead may be used for experimenting. For example, I tried with deadtime of only 10 seconds and initdead of only 20 seconds for testing. In case of live servers, the real environment would decide which values are appropriate.


In this file, we define the virtual IP address to be used by heartbeat.

NOTE: It should be kept in mind that we do NOT need to assign the IP to any interface. Heartbeat would manage requests coming towards the virtual IP i.e. 192.168.1.4.


secondary.example.inv Configuration
First, we would set hostname and then setup heartbeat in the secondary server. The setup process is identical to the primary server.
It is very important that the configuration files of primary and secondary servers are identical. However, minor tuning may be necessary in some cases.
As we need identical configuration files, we would be copying the directory /etc/ha.d from primary server to the secondary server.

Time to edit to configuration files:


Since we are using unicast instead of broadcast, we have to specify which way heartbeat periodic packets should be sent


Samba Configuration
Because both of the servers have separate storage, we have to keep in mind that both servers are running independent instances of samba. But since we want to configure the second server as backup, we have to make sure that both samba servers have identical user database. This post can be consulted to see how samba users can be migrated.

First, we have to make sure that /etc/passwd, /etc/group and /etc/shadow are identical. I was unable to come up with an automatic method that could sync only the human users ( UID 500 and onwards). So, synchronizing these files must be done manually, which is described

Then, we synchronize samba files in both machines


Now we are almost ready.


Running Heartbeat

Primary Server:


Secondary Server:


NOTE: It should be kept in mind that heartbeat would deal with starting/stopping any managed service. Any heartbeat managed service should NEVER be manually started/stopped because it would create problems in normal cluster operation. This is the reason why these services should also not be run during startup process.

Testing
It is always a good idea to analyze the log files. Heartbeat logs are stored in /var/log/ha-log. Useful information can also be found in /var/log/messages. The, /var/log/messages file should show which server is acting as the domain controller. So, the first thing to do is, to analyze the log files.

Then, since both the servers have the same user database, testing can be done by logging into the domain from windows clients. If a domain user can log into the domain using the primary server, the same user should also be able to login to the domain if the primary server is powered down (or heartbeat in primary server is stopped).

Troubleshooting
  1. I have SELinux disabled.
  2. In this configuration, heartbeat uses port UDP 694 and firewall must not block this port.
  3. The virtual IP is managed by heartbeat and does not need to be assigned to any device.
  4. The heartbeat managed services are started/stopped by heartbeat. They should not be run/stopped manually.
  5. The heartbeat managed services should not be automatically run at system startup.
Hope it helps :)