interview question and answer

October 9, 2015

How to enable BitLocker on Windows Server 2012 R2

Thanks to the improvements of virtualization and storage technologies, it’s not difficult to clone a disk. A great advantage for disaster recovery, but also a potential risk for the security of your information.
Microsoft allows to encrypt the disks of a server with a feature named BitLocker. We are going to see how you can enable BitLocker on a physical or virtual server to protect your company from data theft.
Install the BitLocker Drive Encryption feature with the Add Roles and Features Wizard:
How to enable BitLocker on Windows Server 2012 R2
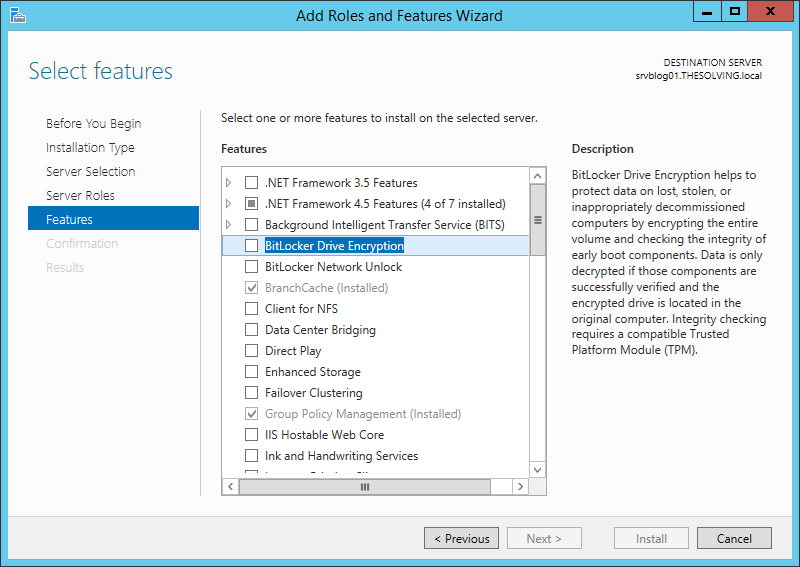
You need to restart the system after the installation:
How to enable BitLocker on Windows Server 2012 R2
How to enable BitLocker on a virtual machine (without TPM)
You need the Trusted Platform Module (TPM) in order to take advantage of BitLocker encryption. Virtual machines don’t have the TPM module so you need to follow these two steps BEFORE configuring BitLocker (BitLocker must be installed on the server).
Open the Local Group Policy Editor (gpedit.msc) and go to Computer Configuration/Administrative Templates/Windows Components/BitLocker Drive Encryption/Operating System Drives. Double-clickRequire additional authentication at startup:
How to enable BitLocker on Windows Server 2012 R2
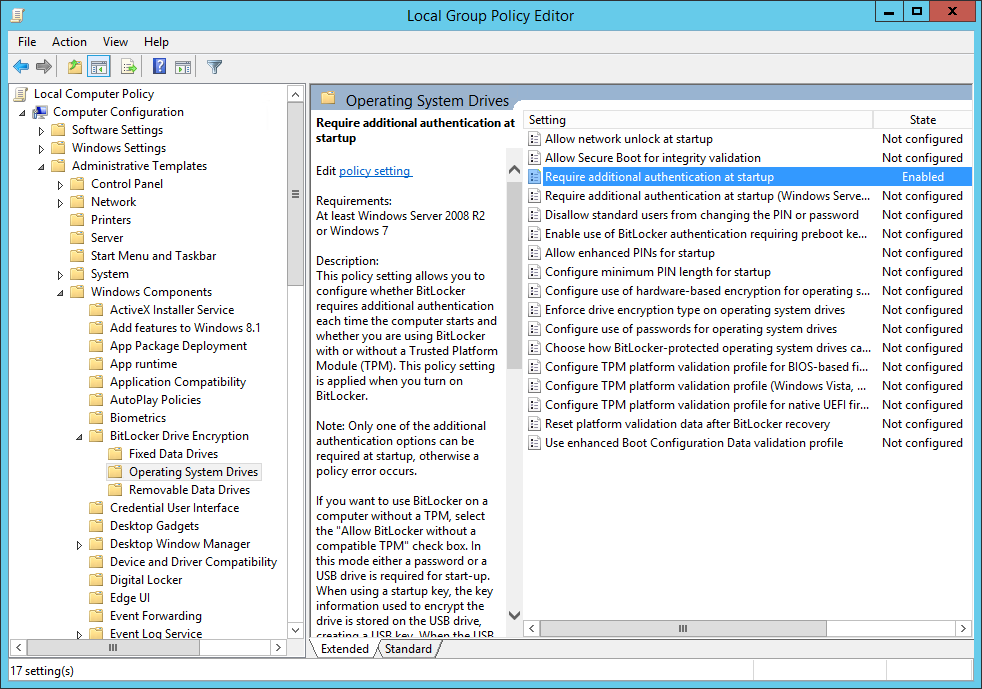
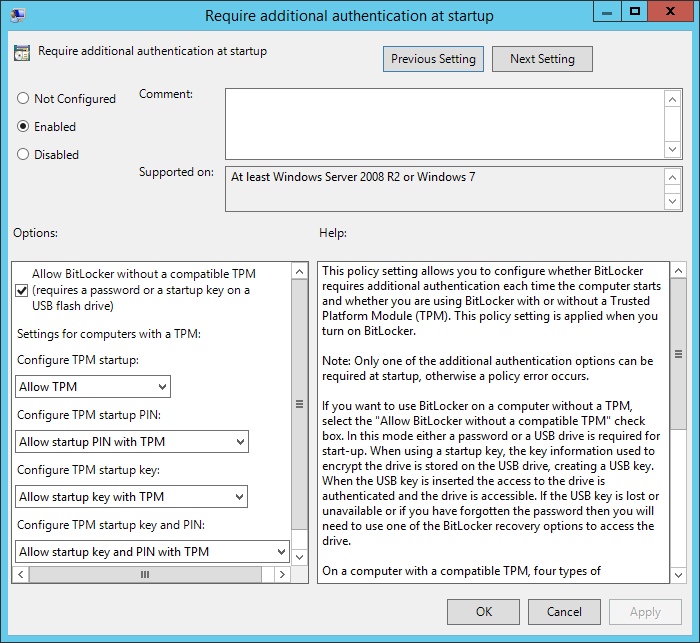
Select Enable and check Allow BitLocker without a compatibile TPM:
How to enable BitLocker on Windows Server 2012 R2
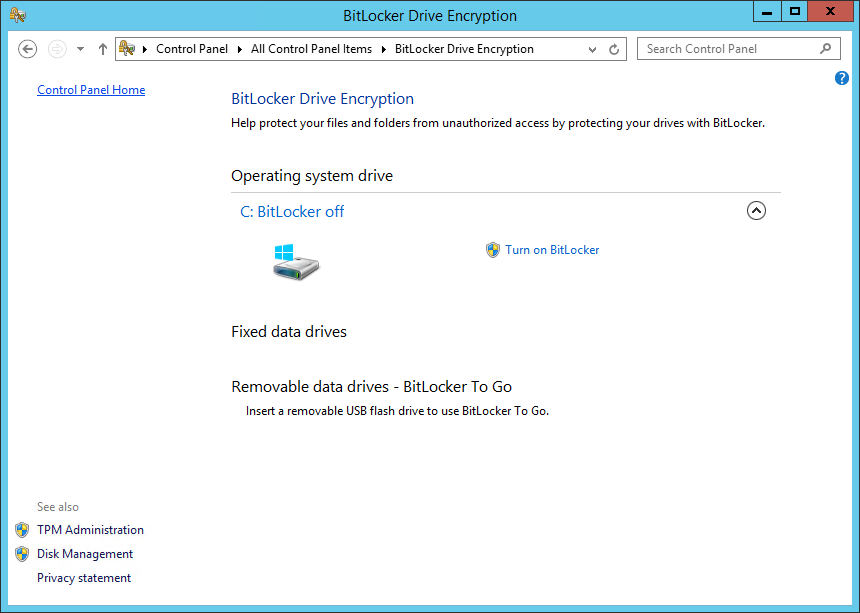
After a restart, open the Control Panel, you’ll find the BitLocker configuration panel. Open it and clickTurn On BitLocker:
How to enable BitLocker on Windows Server 2012 R2
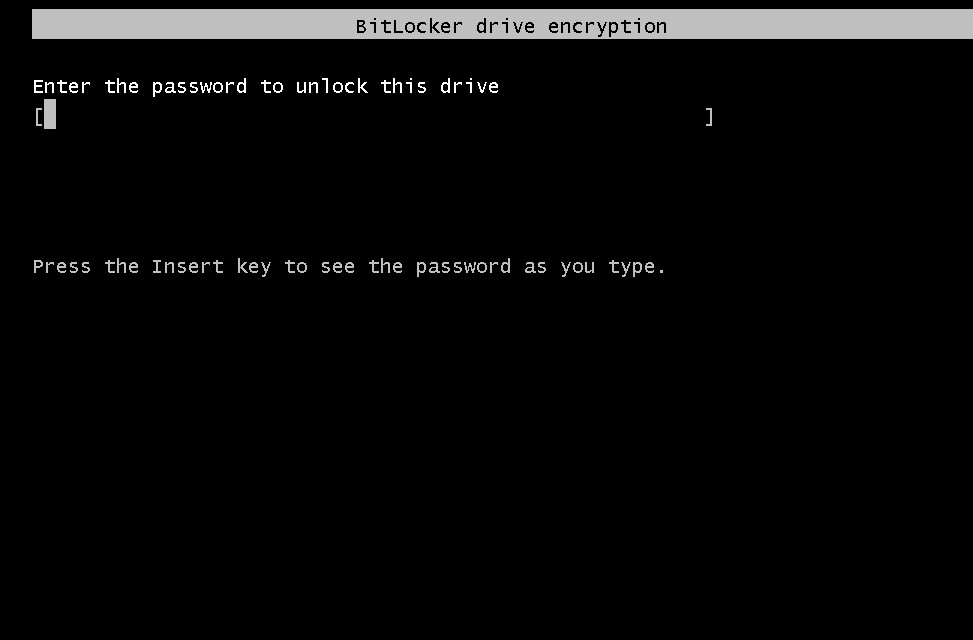
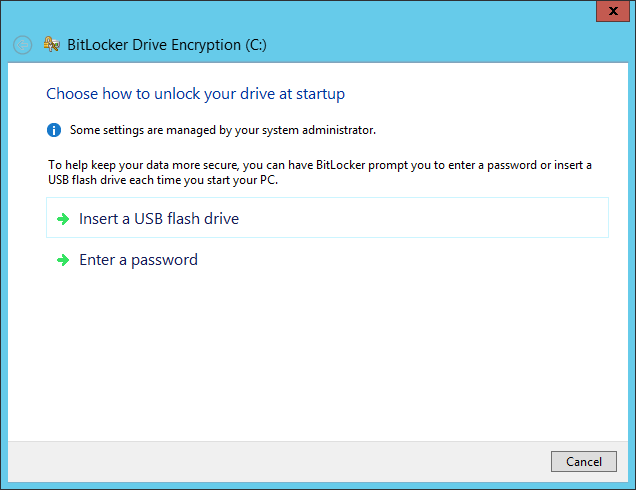
In this tutorial we used a VM, so a system without a TPM, and Windows aks us to configure an additional authentication at startup. We chose a password to protect the data, but we suggest to use a USB flash drive instead. With a flash drive you don’t have to enter the password at every server restart, just leave the USB drive plugged and you’ll be fine:
How to enable BitLocker on Windows Server 2012 R2
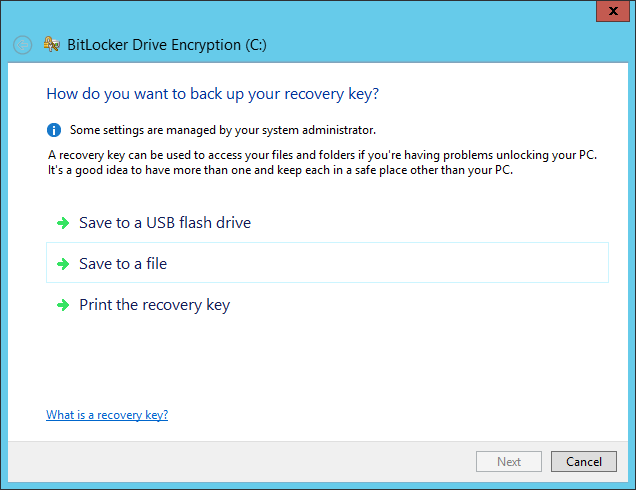
A recovery key can save you from big troubles. We printed it for security reasons:
How to enable BitLocker on Windows Server 2012 R2
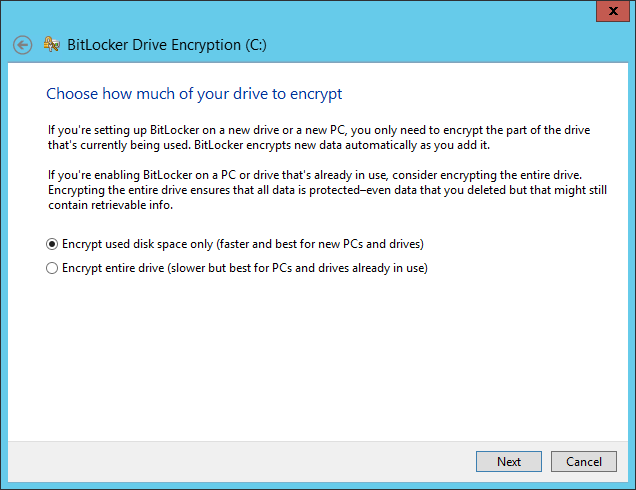
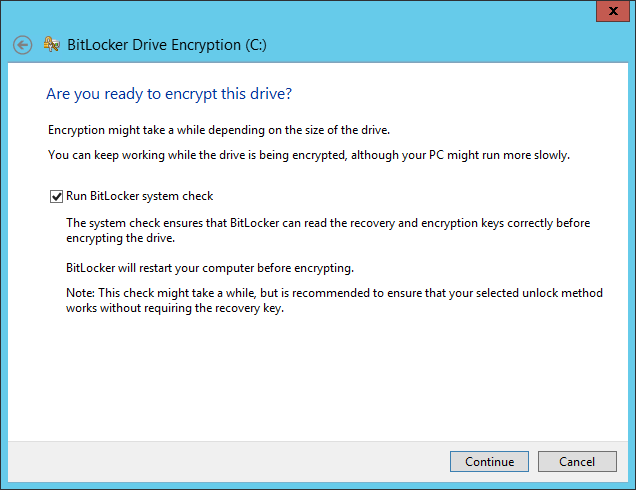
Choose the encryption mode more suited for your disks:
How to enable BitLocker on Windows Server 2012 R2
Click Continue:
How to enable BitLocker on Windows Server 2012 R2
Restart the system:
How to enable BitLocker on Windows Server 2012 R2
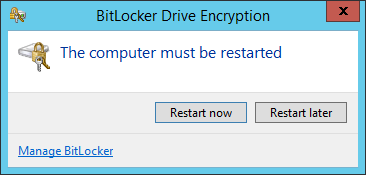
At the next boot you’ll be “forced” to enter the password or plug the USB flash drive. After the Windows start BitLocker will begin the encryption process:
How to enable BitLocker on Windows Server 2012 R2

How to enable Roaming Profiles on Windows Server 2012 R2

Roaming Profiles allow users of an Active Directory Domain to access their desktop and documents from any PC of the domain.
It’s a powerful feature that can improve the productivity of the employees and make their lives easier.
The best thing about Roaming Profiles is how they are easy to set up.
Before configuring a Roaming Profile, we need to create a Share. Open the Server Manager and go to the Shares tab:
How to enable Roaming Profiles on Windows Server 2012 R2
Create a new Share:
How to enable Roaming Profiles on Windows Server 2012 R2
Click Next:
How to enable Roaming Profiles on Windows Server 2012 R2
Specify the path of the Roaming Profiles. Add a $ to the end of the path to make the shared folder invisible:
How to enable Roaming Profiles on Windows Server 2012 R2
Click Next:
How to enable Roaming Profiles on Windows Server 2012 R2
Enable access-based Enumeration (for better security):
How to enable Roaming Profiles on Windows Server 2012 R2
Now it’s time to customize the permissions. We need to allow the access to Domain Users (or another Group). Click Customize permissions:
How to enable Roaming Profiles on Windows Server 2012 R2
Click Add:
How to enable Roaming Profiles on Windows Server 2012 R2
Select the group (Domain Users in our example) and apply the permissions to This folder only. You need to enable List folders / read data and Create folders / append data:
How to enable Roaming Profiles on Windows Server 2012 R2
Confirm and the share will be created:
How to enable Roaming Profiles on Windows Server 2012 R2
Now the final step. Open the Active Directory Users and Computers panel:
How to enable Roaming Profiles on Windows Server 2012 R2
Open the Properties of a user and go to the Profile tab. Specify the Profile Path:\\server_name\profile_folder_name\%username%
How to enable Roaming Profiles on Windows Server 2012 R2
Mission accomplished! Your first Roaming Profile is enabled and active. To create other Roaming Profiles use the copy functionalities or manually specify the Profile Path.
You can also create a policy to automate the process.

How to: Software Restriction policies with AppLocker

We’ve already seen how to restrict software on Windows Server 2012 // R2 using GPOs. There’s another way available since Windows Server 2012, thanks to a feature called AppLocker.
We still use GPOs – AppLocker is a subset of GPOs – to enforce software restriction but it’s easier and more powerful.
AppLocker can manage execution permissions of:
  • Executables: files with .exe extension
  • Windows installers: Windows installer packages with .msi and .msp extensions
  • Scripts: files with .ps1, .bat, .cmd, .cbs and .js extensions
  • Packaged Apps: Windows Store apps
Open the Server Manager and launch the Group Policy Management:
Enforce Software Restriction policies with AppLocker
Create a new GPO:
Enforce Software Restriction policies with AppLocker
Edit the policy:
Enforce Software Restriction policies with AppLocker
You will find the AppLocker settings inside the path Computer Configuration\Policies\Windows Settings\Security Settings\Application Control Policies\AppLocker. Click Configure rule enforcement:
Enforce Software Restriction policies with AppLocker
Check all the rules if you want to enforce them. By default AppLocker blocks all executables, installer packages and scripts, except for those specified in Allow rules:
Enforce Software Restriction policies with AppLocker
AppLocker differs from software restriction policies for the ability to automatically create rules. Right-click in the white box and select Automatically Generate Rules, a wizard will appear:
Enforce Software Restriction policies with AppLocker
Specify the users that will be affected and select the path that will be analyzed to automatically create “Allow execute” rules:
Enforce Software Restriction policies with AppLocker
You can choose to allow or not-allow the execution of unsigned executables. It’s better to create the rules based on the executable hash rather than the file path, it’s more reliable:
Enforce Software Restriction policies with AppLocker
Click Create:
Enforce Software Restriction policies with AppLocker
The new rules will appear:
Enforce Software Restriction policies with AppLocker
We can also manually create other rules. Right-click on the background and choose Create New Rule:
Enforce Software Restriction policies with AppLocker
Click Next:
Enforce Software Restriction policies with AppLocker
Specify the users who will be affected by the rule and the rule type (Allow or Deny execution):
Enforce Software Restriction policies with AppLocker
There are three ways to specify which applications will be affected by the rule:
  • Publisher: identify the applications signed by a specific publisher;
  • Path: identify specific files and paths;
  • File Hash: identifiy applications based on their digital fingerprint.
In our example we chose Path:
Enforce Software Restriction policies with AppLocker
Specify the Path:
Enforce Software Restriction policies with AppLocker
You can add exceptions if you need them:
Enforce Software Restriction policies with AppLocker
Name your new rule and click Create:
Enforce Software Restriction policies with AppLocker
The rule will appear:
Enforce Software Restriction policies with AppLocker