interview question and answer

Showing posts with label Tips and Trick. Show all posts

April 27, 2013

How to use Group Policy to disable USB drives on Windows XP

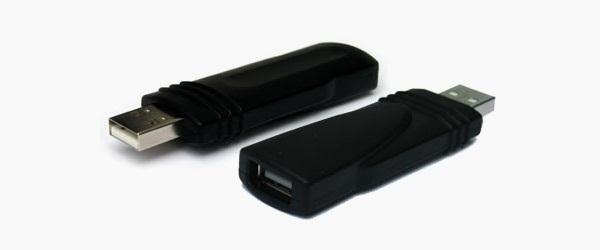
there is also a registry key in Windows XP that allows you to block the use of USB storage devices. Now there are two ways to prevent USB storage devices so you may want to implement either or both methods in your organisation. First method prevents computers that have already had USB devices installed and the second prevents any new USB devices from installing.

How to block existing USB Storage Devices


To implement this edit a Group Policy Object that is applied to all the workstations in your organisation navigate to Computer Configuration > Preferences >Windows Settings > Registry. Then click on Action > New > Registry Item type SYSTEM\CurrentControlSet\Services\UsbStor into the Key Path field then type Start into the Value Name field and 4 in the Value Data field and click OK.
image
If you want to prevent the installation of USB storage device then we use Group Policy to set the security on the driver files to prevent then from installing.
Key: HKLM\SYSTEM\CurrentControlSet\Services\UsbStor
Value: Start
Data: 4 (hex) = Disabled
Data: 3 (hex) = Enabled

How to block new USB Storage Devices


This time edit a Group Policy Object that is applied to all the workstations in your organisation navigate to Computer Configuration > Policies > Windows Settings > Security Settings > File System. Then click on “Action” menu and then “Add File”. Navigate to C:\Windows\Inf and select “Usbstor.inf” and press “OK”. Now click on “Users” in the security tab and then click in the “Deny” “Full Control” tick box then click OK.
image
Note: Alternatively you could just add the name of the user or group you want to prevent from using USB storage devices.
Click “Yes” to the security warning.
image
Then click OK.
Note: Remember that deny permission take precedence so inherited permission will not have any affect and that we are applying the permission directly to a file so we don’t need to worry about inheritance from this object.
image
Now repeat the steps above and this time select “C:\Windows\Inf\Usbstor.pnf”
You should see something like the images below in your group policy.
image
Now either way when users plug in a USB Storage devices into a computer it will prevent OS from seeing the device thus preventing the users from reading and writing to removable media.

See the Microsoft article about this option at http://support.microsoft.com/kb/823732

April 22, 2013

Hacking the Trend Micro Security Dashboard for SMB: Reset the Password

Trend Micro’s Client Server Security for SMB is a well-designed security solution for small businesses. One of its greatest features is the ability to be deployed, updated, and controlled via the local network. With the push of a button you can scan all networked computers, increase security, send messages or print reports.
I’ve recently taken over the role of administrator for a company and unfortunately the Trend Micro passwords were lost.
Fear not, there is a simple method to resetting the password (too easy?)
1.       Navigate to: \Program Files\Trend Micro\security server(officescan)\private
2.       Open ofcserver.ini in Notepad
3.       Press CTRL-F to search for: master_pwd
4.       Once found, the string should look similar to: master_pwd=!CRYPT!xxxxx
5.       xxxxx is representative of a long string of hex characters making up an encrypted password
6.       In place of !CRYPT!xxxxx put “70″ so it will look like: master_pwd=70
7.       70 is the hexadecimal value for “1″
8.       Save the file
9.       Press Start -> Run -> Type: services.msc and press enter
10.    Find “Trend Micro Security Server Master Service” and restart the service
11.    Login to the Trend Micro Security Dashboard with the password as “1″ without the quotations

12.    The default URL for the dashboard is: https://IPADDRESS:4343/officescan/default_SMB.htm

Free way to block Facebook or other Websites?

Not all companies have programs or licences for content filtering on their networks. It is arguably worth the $10-$60 per employee/year to licence a content filtering package in terms of increased productivity. What is difficult is selling the idea of spending a large chunk of money to management, especially in this economy. I would imagine a large number of companies can pinpoint their bandwidth and productivity problems to 10 or fewer websites. Facebook, Myspace, Youtube, etc…
Below is a logon script for Windows that will analyze the user’s hosts file and modify it accordingly to block Facebook or any other website you wish. It simply redirects to 127.0.0.1 (home).
Set objFSO = CreateObject("Scripting.FileSystemObject")
Set objShell = CreateObject("WScript.Shell")
Const ForReading = 1
Const ForWriting = 2
Const ForAppending = 8
hostsFile = objShell.ExpandEnvironmentStrings("%SystemRoot%") & "\system32\drivers\etc\hosts"
strIP = "127.0.0.1"
strValue = "facebook.com"

If objFSO.FileExists(hostsFile) Then
 Set objTextFile = objFSO.OpenTextFile(hostsFile, ForReading)
Else
 Set myFile = objFSO.CreateTextFile(hostsFile, True)
 myFile.WriteLine "127.0.0.1       localhost"
 myFile.WriteLine strIP & " " & strValue
 Wscript.Quit
End If

strFlag = 0
Do Until objTextFile.AtEndOfStream
 strLine = Trim(objTextFile.ReadLine)
 If InStr(strLine, strIP) > 0 Then
  If InStr(strLine, strValue) > 0 Then
   strFlag = "1"
  End If
 End If
Loop
objTextFile.Close

If strFlag = 0 Then
 Set objTextFile = objFSO.OpenTextFile(hostsFile, ForAppending)
 objTextFile.WriteLine vbCrLf & strIP & " " & strValue
End If
Another alternative is to block the IP address of the website using rules on your gateway firewall (Windows or router). The problem with this method is many of the larger sites have multiple IP addresses and adding block lines for each is tedious work. You can block entire ranges of IP addresses. Example: Adding 69.63.0.0/16 would block 69.63.0.0 – 69.63.255.255 (65,536 total addresses – 16bit block). Be careful though, some “good” websites may be in the ranges you block, but in a pinch, it does the job.

Finally, Untangle is an open source gateway that can be run on Windows or on its own dedicated server. It includes content filtering in addition to a multitude of other features. Try it out.

February 19, 2013

Bluetooth Audio Streaming from Windows Server 2003 to LG FB163

I've recent got a sexy little LG FB-163 Micro HIFI System that comes with Bluetooth. Unfortunately, the Bluetooth is only used to stream audio, and not for file transfer or sharing as I had originally hoped for.

After a lot of procrastination, I finally got around to try out the Bluetooth function. After a lot of experimentation, I got it working with the following configuration:
OS: Windows Server 2003
BT Stack: BlueSoleil version 6.2.227.11 (Demo)
BT Dongle: D-Link DBT-120 rev B4 

At first, I was using a hacked Windows XP Bluetooth stack with a D-Link DBT-120 rev B4 dongle as Windows 2003 do not come with a Bluetooth stack, but I couldn't get my PC to pair with the FB-163.


As the FB-163 uses the newer A2DP Bluetooth profile, I went out and bought a newer dongle (unbranded model ES-389), thinking that it is a hardware problem. The ES-389 was detected as a "Silicon Wave" bluetooth device by Windows, but couldn't pair with the FB-163 either.
So I thought, maybe I need a newer Bluetooth stack. Thus I installed BlueSoleil version 6.2.227.11 as I had downloaded the demo version previously.Unfortunately, when I tried to pair ES-389 with the FB-163, it couldn't even get FB-163's device name. The error message was "Refreshing device name is not successful".


After a lot of troubleshooting, I replaced the ES-389 with my older DBT-120 as I remembered that the D-Link dongle could at least get the device name from FB-163. 

The short version is that it worked, and here are the steps I took:

  1. In the start screen, the FB-163 is identified by a "Headset" icon with its MAC address.
  2. When I right-clicked the "Headset" icon and chose "Get Device Name", it worked and got the "LG_AUDIO" device name.

  3. I right-clicked the Headset icon and chose "Pair". The passkey dialog box appeared and I entered the default PIN "0000" (Why do everyone seem to use the same PIN?).

  4. The DBT-120 and FB-163 are now paired.

  5. Finally, I right-clicked the Headset icon and chose "Connect Bluetooth Advance Audio". The DBT-120 and FB-163 are now connected.
I fired up my music player and the music streaming worked perfectly.

January 14, 2013

4 Ways to Crack a Facebook Password and How to Protect Yourself from Them


Despite security issues that have plagued Facebook for several years, people keeping staying around and new people keep on signing up. This has led Facebook to break records numbers with over one billion monthly active users as of October 2012—and around 600 million active daily users.
We share our lives on Facebook. We share our birthdays and our anniversaries. We share our vacation plans and locations. We share the births of our sons and the deaths of our fathers. We share our most cherished moments and our most painful thoughts. We divulge every aspect of our lives.
But we seemingly forget who's watching.
We use Facebook as a tool to connect, but there are those people who use that connectivity for malicious purposes. We reveal what others can use against us. They know when we're not home and for how long we're gone. They know the answers to our security questions. People can practically steal our identities—and that's merely with the visible information we purposely give them through our Facebook profile.
The scariest part is that as technology advances, we become more susceptible to hacking. As if we didn't already do a great enough job to aid these hackers, they can get into our emails and Facebook accounts and steal every other part of our lives that we intended to keep away from prying eyes.
And you don't have to be a professional hacker to get into someone's Facebook account.
It can be as easy as letting Firesheep run on your computer for a few minutes. In fact, Facebook allows a user to get into their Facebook without knowing their password. All they have to do is choose three friends to send a code to. You type in the three codes and voilà—you're into the account. It's as easy as that.
These are a few other ways that hackers, and even regular folks, can hack into someone's Facebook account and ways to prevent it from happening to you.

Reset the Password

The easiest way to "hack" into someone's Facebook is through resetting the password. This could be easier done by people who are friends with the person they're trying to hack.
  • The first step would be to get your friend's Facebook email login. If you don't already know it, try looking on their Facebook page in the Contact Info section.
  • Next, click on Forgotten your password? and type in the victim's email. Their account should come up. Click This is my account.
  • It will ask if you would like to reset the password via the victim's emails. This doesn't help, so press No longer have access to these?
  • It will now ask How can we reach you? Type in an email that you have that also isn't linked to any other Facebook account.
  • It will now ask you a question. If you're close friends with the victim, that's great. If you don't know too much about them, make an educated guess. If you figure it out, you can change the password. Now you have to wait 24 hours to login to their account.
  • If you don't figure out the question, you can click on Recover your account with help from friends. This allows you to choose between three and five friends.
  • It will send them passwords, which you may ask them for, and then type into the next page. You can either create three to five fake Facebook accounts and add your friend (especially if they just add anyone), or you can choose three to five close friends of yours that would be willing to give you the password.
How to Protect Yourself
  • Use an email address specifically for your Facebook and don't put that email address on your profile.
  • When choosing a security question and answer, make it difficult. Make it so that no one can figure it out by simply going through your Facebook. No pet names, no anniversaries—not even third grade teacher's names. It's as easy as looking through a yearbook.
  • Learn about recovering your account from friends. You can select the three friends you want the password sent to. That way you can protect yourself from a friend and other mutual friends ganging up on you to get into your account.

Use a Keylogger

Software Keylogger
A software keylogger is a program that can record each stroke on the keyboard that the user makes, most often without their knowledge. The software has to be downloaded manually on the victim's computer. It will automatically start capturing keystrokes as soon as the computer is turned on and remain undetected in the background. The software can be programmed to send you a summary of all the keystrokes via email.
CNET has Free Keylogger, which as the title suggests, is free. If this isn't what you're looking for, you can search for other free keyloggers or pay for one.
Hardware Keylogger
These work the same way as the software keylogger, except that a USB drive with the software needs to be connected to the victim's computer. The USB drive will save a summary of the keystrokes, so it's as simple as plugging it to your own computer and extracting the data. You can look through Keelog for prices, but it's bit higher than buying the software since you have the buy the USB drive with the program already on it.
How to Protect Yourself
  • Use a firewall. Keyloggers usually send information through the internet, so a firewall will monitor your computer's online activity and sniff out anything suspicious.
  • Install a password manager. Keyloggers can't steal what you don't type. Password mangers automatically fill out important forms without you having to type anything in.
  • Update your software. Once a company knows of any exploits in their software, they work on an update. Stay behind and you could be susceptible.
  • Change passwords. If you still don't feel protected, you can change your password bi-weekly. It may seem drastic, but it renders any information a hacker stole useless.

Phishing

This option is much more difficult than the rest, but it is also the most common method to hack someone's account. The most popular type ofphishing involves creating a fake login page. The page can be sent via email to your victim and will look exactly like the Facebook login page. If the victim logs in, the information will be sent to you instead of to Facebook. This process is difficult because you will need to create a web hosting account and a fake login page.
If you want to know how to do this, follow the detailed instructions onHacker9's website. Users are very careful now with logging into Facebook through other links, though, so that only adds to this already difficult process.
How to Protect Yourself
  • Don't click on links through email. If an email tells you to login to Facebook through a link, be wary. Check the URL. If you're still doubtful, go directly to the main website and login the way you always do.
  • Phishing isn't only done through email. It can be any link on any website. Even ads that pop up can be malicious. Don't click on any sketchy looking links that ask for your information.
  • Use an anti-virus like Norton or McAfee.

Stealing Cookies

Cookies allow a website to store information on a user's hard drive and later retrieve it. These cookies contain important information that a hacker can sniff out and steal if they are on the same Wi-Fi network as the victim. They don't actually get the login passwords, but they can still access the victim's account.
Firesheep is a Firefox add-on that sniffs web traffic on an open Wi-Fi connection. It collects the cookies and stores them in a tab on the side of the browser.
From there, the hacker can click on the saved cookies and access the victim's account, as long as the victim is still logged in. Once the victim logs out, it is impossible for the hacker to access the account.
How to Protect Yourself
  • On Facebook, go to your Account Settings and check under Security. Make sure Secure Browsing is enabled. Firesheep can't sniff out cookies on HTTPS, so try to steer away from HTTP.
  • Full time SSL. Use Firefox add-ons such as HTTPS-Everywhere or Force-TLS.
  • Log off a website when you're done. Firesheep can't stay logged in to your account if you log off.
  • Use only trustworthy Wi-Fi networks. A hacker can be sitting across from you at Starbucks and looking through your email without you knowing it.
  • Use a VPN. These protect against any sidejacking no matter what website you're on.

Less Is More

Social networking websites are great ways to stay connected with old friends and meet new people. Creating an event, sending a birthday greeting and telling your parents you love them are all a couple of clicks away.
Facebook isn't something you should steer away from, but you do need to be aware of your surroundings and make smart decisions about what you put up on your profile. The less information you give out on Facebook for everyone to see, the more difficult you make it for hackers.

Transfer Files Through WiFi in Nokia Mobiles


Now a Days Mobile Phones are Used As mini PC, they are much used for Camera, Music Playback, Video and Surfing.. But Transfer of Files is Only Possible through USB cables between PC and Mobile Phone.
Why Are you Still using same old USB transfer While you can Transfer Without Wires?
Now there is an Option of Transferring Files through Wifi With the Help of  Telexy.Networks.SymSMB. SymSMB is a mobile Software For Nokia S60 3rd edition NSeries and ESeries devices. But i Also Works on S60V5 Like Nokia 5800 XM, Nokia 97 and other Touch mobile Which have In-built WIFI.
SymSMB is
-Easy to Use
-Two Directional
-Secure
-Fast
With SymSMB you can:
- work with your phone’s files from a computer through “Network Neighborhood” without any additional software on the computer
- access your phone from different operating systems.
In the Below Screen Shot Can Clearly See My mobile(Karthik 5800) And PC(Karthik-PC) in Network Neighborhood Mobile :D
Transfer Files Through WiFi in Nokia Mobiles
How to Install and Configure SymSMB?
1. You Must Install SymSMB on your mobile.
2. You Must Have Wifi Router or Modem and PC connected to it :)
After Installing :
1. Open SymSMB,You can See 3 Options (My Phone, Network neighborhood, Control Panel)
2. In My Phone You Can See The Disk Available in Phone!
3. Goto Control Panel there You Can See 4 Options
- Accounts
- Connections
- Network Drives
- Shares
4. Goto Control panel ->Accounts -> Options -> New =>
-There Will Be to Field User and Password
-Enter the Username and Password of the Computer
Note : This is Required IF the Sharing of Network is Password Protected in PC
5. Goto Control panel -> Connections -> Options -> New =>
-Give Your Desired name in name Field, In Workgroup Enter Workgroup, in Access point Select Your WIFI Modem, Change to Enable in Autoconnect
-Save the Settings Now you See Your Phone Name in Connection
6.Goto Control Panel / Shares – Options -> New ->
-Select the Folder to Share in the Phone Save
Now You See the Shared Folders in Control Panal/Shares
Select The Folder – Goto Options – Permissions
In Permission Can Select Everyone or Desired User(Where You Created in Accounts)
NOTE : In order to Protect Your Data Never Share the Entire Disk With Every one. Always Create a New Folder With Empty Files to Share with Everyone.
Now You Have Successfully Configured Your Control Panel
Now Goto Network Neighborhood Select the WiFi Modem u Want to Access Give Some time ! now u can See the List of Computes Connected in that Modem and u can Access the Files Shared by the PC. Likewise You Can also Access your Mobile Shared Files Through Your Computer. This also Works with Other Phones Connected to the WiFi! :)
If u Have Further Questions Feel Free to Contact Me ! :)

November 23, 2012

how to create partitions using fdisk and different filesystem like ext2,ext3 and ext4 in Linux


Disk Partitioning & Managing Partitions
When we format a computer hard drive, we will lose everything that is on the drive. Therefore, it is very important to back up anything you might later want.To format a secondary drive, we  need root access. Linux allows only 4 primary partitions.

on an IDE drive, the first drive is called hda, and the partitions are shown as hda1, hda2 . . . . etc. etc. Your second drive is called hdb.On an IDE drive you can have up to 63 partitions, 3 primary and 60 logical ( contained in one extended partition )
On a SCSI drive, the first drive is called sda, the partitions are sda1, sda2 . . The second drive is called sdb.On an IDE drive you can have up to 63 partitions, 3 primary and 60 logical ( contained in one extended partition )
An extended partition is the only kind of partition that can have multiple partitions inside. Think of it like a box that contains other boxes, the logical partitions. The extended partition can't store anything, it's just a holder for logical partitions.

The extended partitions is a way to get around the fact you can only have four primary partitions on a drive. You can put lots of logical partitions inside it.

We can see all the drives attached to your system by typing the command "ls /dev/hd*" or "ls /dev/sd*", depending on which type (IDE, SATA and so forth) the drives are. On the example system, the result of this command looks like "/dev/hda /dev/hda1 /dev/hda2 /dev/hdb /dev/hdb1". The operating system is installed on hda, which has two partitions (hda1 and hda2), and there is one partition on hdb and hdb1.

Steps for Creating partition using fdisk command : -
Step:1  To list available drives on you machine type:
# fdisk -l
Choose the drive you want to make changes to and engage it using fdisk:
# fdisk /dev/sdc
replace the "sdc" with the drive you want to edit.
The basic fdisk commands you need are:
o                              m - print help
o                              p - print the partition table
o                              n - create a new partition
o                              d - delete a partition
o                              q - quit without saving changes
- write the new partition table and exit
Step:2  Enter "p" to see the partition table of the drive. The first line of output from the "p" command will also tell you the size of the drive. This is a good way to double-check that you are working with the correct drive.
Step:3 Type "n" and hit "Enter." Then press "p" to create a primary partition. It asks you for a partition number; enter "1." Now you are asked which cylinder the partition should start at. The beginning of the drive is the default, so just hit "Enter." Then, you are asked for the last cylinder. The end of the drive is the default, so you can just press "Enter" again.
Step:4 Now you are back at fdisk's command prompt. Use the "p" command to check the partition table. You should now see your new partition at the bottom of the output.


Step:5   Now  we need to set the filesystem type for your new partition with the "t" command. We are asked for the Hex code of the filesystem you wish to use. We will use the standard Linux ext2 filesystem, which is "83." If you are doing something special and know of a particular filesystem that you need to use, you can press "L" to see all the codes, which are one or two characters made up of the numbers 0 to 9 and the letters a to f.
Step:6  Now just issue the "w" command to write your new partition table and exit fdisk

Step:7  # partprobe      (command used to force the kernel to re-read the new partition table)
To Delete Partitions using fdisk command
> 
Let us as suppose  that we want to remove a partition from /dev/hdb disk. Type the following command:

Step:1 # fdisk /dev/hdb
Now type p command to list partition:
Command (m for help): p

Step:2 Now let us say you want to delete /dev/hdb3 (3rd partition). Type the d command to delete a partition:

Command (m for help):
 d
Partition number (1-4):
 3
Step:3 It will prompt you for the partition number. Type 3:
Verify that partition deleted:
Command (m for help): p
Now save the changes and exit to shell prompt. Type the w command:
Command (m for help): w
Reboot the system OR run  partprobe  command
Formatting the Partitions
To use the partition we need to format the partitions using the different filesystem. We can format the partitions using either mkfs or mke2fs command.
# mkfs.ext2 /dev/sdb1            (ext2 filesystem)
# mkfs.ext3 /dev/sdb1            (ext3 filesystem)
# mkfs.ext4  /dev/sdb1            (ext4 filesystem)
# mkfs.vfat /dev/sdb1              (DOS filesystem)
Mount the new disk using mount command
First create a mount point /data and use mount command to mount /dev/sdb1, enter:

# mkdir /data
# mount /dev/sdb1 /data
# df -H
Update /etc/fstab file
Open /etc/fstab file, enter:

# vi /etc/fstab
Append as follows:
/dev/sdb1         /data         ext3         defaults         1         2

Save and close the file.
Brief Description about the File system:-

Ext2
  1.           Ext2 stands for second extended file system.
  2.             It was introduced in 1993. Developed by Rémy Card.
  3.            This was developed to overcome the limitation of the original ext file system.
  4.             Ext2 does not have journaling feature.
  5.            On flash drives, usb drives, ext2 is recommended, as it doesn’t need to do the over head of journaling.

                Maximum individual file size can be from 16 GB to 2 TB
Overall ext2 file system size can be from 2 TB to 32 TB

Ext3
  1.                               Ext3 stands for third extended file system.
  2.                               It was introduced in 2001. Developed by Stephen Tweedie.
  3.                             Starting from Linux Kernel 2.4.15 ext3 was available.
  4.                             The main benefit of ext3 is that it allows journaling.
  5.                            Journaling has a dedicated area in the file system, where all the changes are tracked.      When the system crashes, the possibility of file system corruption is less because of journaling.
  6.                           Maximum individual file size can be from 16 GB to 2 TB
  7.                            Overall ext3 file system size can be from 2 TB to 32 TB

                                         There are three types of journaling available in ext3 file system.
                                                 Journal – Metadata and content are saved in the journal.
                                             Ordered – Only metadata is saved in the journal. Metadata are journaled only after writing                 
                                        the content to disk. This is the default.
                                            Writeback – Only metadata is saved in the journal. Metadata might be journaled either 
                                           before or after the content is written to the disk.
                        You can convert a ext2 file system to ext3 file system directly (without backup/restore).

Ext4
  1.                               Ext4 stands for fourth extended file system.
  2.                             It was introduced in 2008.
  3.                            Starting from Linux Kernel 2.6.19 ext4 was available.
  4.                          Supports huge individual file size and overall file system size.
  5.                           Maximum individual file size can be from 16 GB to 16 TB                         Overall maximum ext4 file    system size is 1 EB (exabyte). 1 EB = 1024 PB (petabyte). 1 PB = 1024 TB (terabyte).
  6.                            Directory can contain a maximum of 64,000 subdirectories (as opposed to 32,000 in ext3)
  7.                          You can also mount an existing ext3 fs as ext4 fs (without having to upgrade it).
  8.                            Several other new features are introduced in ext4: multiblock allocation, delayed allocation, journal checksum. fast fsck, etc. All you need to know is that these new features have improved the performance and reliability of the filesystem when compared to ext3.

In ext4, you also have the option of turning the journaling feature “off”.